I have many goals starting a YouTube channel, but I’ll start with listing 4 of them here.
I’m venturing into new things for 2021 and one of them is starting a YouTube channel. I have to admit, the writing for a blog is a bit easier for me than the speaking on camera. I think that’s probably why I’ve written more blog posts than I’ve posted videos.
Here are my 2021 YouTube Goals:
1. Get to 1000 subscribers
This is the level that YouTube says you need to start becoming monetized on YouTube. Not only do you need 1000 subscribers, but you also need 4000 watch hours. Hopefully, I’ll get to between 1000 and 100,000 subscribers by December 31, 2021.
2. Become more comfortable on video
I would like to become more comfortable and self-confident on video. There is a lot of fear and anxiety associated with this new project, but I really want to work through this. I want to challenge myself to do this and inspire others to try new things and go after their dreams or goals.
I am currently using iMovie for my recording through my Macbook. My skills are limited at the moment, but I hope to continue improving with each video that I make. I will learn as I go and continue to get better as I learn more about video editing.
4. Consistency
There is no growth without consistency. I will have to make a goal to post at least one video per video, if not more. So, that means I have to find out what topics would be interesting to talk about and make content. For now, I’m going to focus on the things I enjoy sharing with others and continue to improve my presenting and video editing skills.
If you’d like to check out the YouTube video where I talk about these goals, here it is!
I’m venturing into new things for 2021 and one of them is starting a YouTube channel. I have to admit, the writing for a blog is a bit easier for me than the speaking on camera. I think that’s probably why I’ve written more blog posts than I’ve posted videos.
Here are my 2021 YouTube Goals:
1. Get to 1000 subscribers
This is the level that YouTube says you need to start becoming monetized on YouTube. Not only do you need 1000 subscribers, but you also need 4000 watch hours. Hopefully, I’ll get to between 1000 and 100,000 subscribers by December 31, 2021.
2. Become more comfortable on video
I would like to become more comfortable and self confident on video. There is a lot of fear and anxiety associated with this new project, but I really want to work through this. I want to challenge myself to do this and inspire others to try new things and go after their dreams or goals.
3. Learn video editing skills
I am currently using iMovie for my recording through my Macbook. My skills are limited at the moment, but I hope to continue improving with each video that I make. I will learn as I go and continue to get better as I learn more about video editing.
4. Consistency
There is no growth without consistency. I will have to make a goal to post at least one video per video, if not more. So, that means I have to find out what topics would be interesting to talk about and make content. For now, I’m going to focus on the things I enjoy sharing with others and continue to improve my presenting and video editing skills.
If you’d like to check out the YouTube video where I talk about these goals, here it is!
time blocking can be an effective time management strategy
There was a period of about 3-4 months when my schedule was extremely busy. I was juggling three different jobs and my own school work. Not to mention, it was the middle of a pandemic and I was packing up my personal belongings to move to a different state as well. I’m usually very good about managing my time using Google calendar and my to-do lists, but I knew I needed something extra if I was going to make sure everything got done.
I did some research on time blocking and adapted it to fit my needs. How many people approach time blocking is to keep a consistent schedule and do similar tasks in that block. For example:
7am-9am – Morning routine/family
9am-11am – Emails/meetings
11am-1pm – Lunch/ light to-do list items
1pm-3pm – Projects/deep thinking
3pm-5pm – Meetings/weekly planning
And so on. It could change daily or be a set weekly routine that someone follows.
I took this idea and combined it with keeping a calendar to schedule out everything that I had to do for the week and I did this every week. I color coded it by the job or task. Here is an example of one of my weeks.
As you can see, I worked quite a bit during that time. Thankfully, my schedule is a little bit lighter now so I don’t have to schedule so strict. However, this method really worked for me when I was juggling a lot of things all at once. The blue was my personal time to do whatever tasks or downtime I needed. I should mention I worked from home through all of this so it was easy to switch between jobs because it was often just a browser or device switch.
I certainly took breaks to get water, coffee, and use the bathroom. I followed good protocol to stand up at least once per hour and rest my eyes from the screen every 20 minutes. So while I didn’t follow this schedule every week to the exact second, I stuck to it pretty closely, and it really helped me accomplish everything without feeling overwhelmed. Every day, I prioritized the tasks that needed to be done that day and followed through on those items to the best extent possible. I had a weekly accountability call with a friend on Sundays to discuss our goals for the week and keep us focused.
Another thing that helped was scheduling times to check my email. Many days I have email open in the background and respond as messages come in if I’m not too busy. However, on days or weeks when I know I will be very busy working on projects, reports, and meetings, I schedule checking email into my calendar. That way, I have the tab closed so it’s not distracting me from my work, but I know I’ll get to it because I’ve prioritized time to deal with it.
I will definitely use this method again during busy seasons of my life!
I wanted to start this blog to share information about what I already know and what I’m learning as well as create a potential outlet for passive income in the future. What I’m finding is that I enjoy writing posts and learning about the technical side of building a website and this really could be more than a side passion if I put my mind to it.
So, one of the things I’m learning is actually how to get this blog going in the first place to build it into something meaningful. I’ve done research by watching YouTube videos and being an expert Googler, but there are still some things that I’m working on. Here are some things that I learned so far:
1. Building Traffic – difference between views and likes
I’m using WordPress premium as my hosting platform. Now that I have about 20 posts on the blog, I’m getting consistent notifications about likes on my posts, which is very exciting. I thought that would immediately translate into more views, but that is not the case. So of course, I Googled it to find out what was going on.
It turns out that most of my readers are viewing the posts through WordPress Reader and liking it there and not actually clicking on the blog itself. So even though the posts are being liked, I’m not getting very many views. Therefore, I need to figure out how to get people to click on the blog and read other content.
2. Building Traffic – Advertising
Now, I’m thinking how do I even let people know about the blog in the first place? I’ve mostly been using Pinterest and creating pins using Canva. I experimented with Pinterest Ads, but it was too expensive and I didn’t get enough clicks to make it worth my while yet. Here is an example of a pin I made for one of my blog posts. I’m considering starting a Twitter account to post tips of the day and drive traffic from there.
3. Search Engine Optimization (SEO)
This is probably the part I still have the most to learn about. The actual building of the site came pretty easily to me since I’ve had to build sites for school projects before. There are a number of websites that let you search for keywords, but the biggest piece of advice I’ve found is to search for long-tail keywords that have lower competition. This is called search engine optimization.
So, perhaps it’s being searched 1,000 times a month, but there aren’t many articles written about that particular topic. Turns out the types of things I like to write about are wildly popular and written about all the time. This is definitely an area of improvement that I’ll keep learning about it and working on for future posts. Perhaps I’ll take an SEO course to help improve my knowledge. It’s something I wish I knew earlier about starting a new blog.
4. Revenue – making money from the blog
One of the reasons of starting a new blog is to make passive income. I’ve watched tons of YouTube videos and read other blog posts to try and figure this one out. It seems you need a combination of advertising, affiliate links, sponsored ads, and even your own personalized premium content. Well, I certainly have lots of ideas and things in the works, but it’s not going to happen overnight. So, for now, I’m just utilizing the WordPress Ads that is built in to the site functions and some Amazon affiliate links.
For transparency, my site ran about 450 ads in February and it generated a revenue of $0.04 and about 1000 ads in March for a revenue of $0.01. Obviously, I was disappointed with the lower number this month even with higher views, so I searched what could be going on. It seems that advertisers might be bidding lower prices for space and my content just hasn’t had enough time to saturate. That’s okay. I actually have a 15-18 month plan in place and this is just the start.
I wanted to share some of the things I’m learning about starting a new blog here with you in this post. Feel free to drop a comment with any tips you have. Let’s help each other!
I wanted to start this blog to share information about what I already know and what I’m learning as well as create a potential outlet for passive income in the future. What I’m finding is that I enjoy writing posts and learning about the technical side of building a website and this really could be more than a side passion if I put my mind to it. So, one of the things I’m learning is actually how to get this blog going in the first place to build it into something meaningful. I’ve done research by watching YouTube videos and being an expert Googler, but there are still some things that I’m working on. Here are some things that I learned so far:
1. Building Traffic – difference between views and likes
I’m using WordPress premium as my hosting platform. Now that I have about 20 posts on the blog, I’m getting consistent notifications about likes on my posts, which is very exciting. I thought that would immediately translate into more views, but that is not the case. So of course, I Googled it to find out what was going on. It turns on out that most of my readers are viewing the posts through WordPress Reader and liking it there and not actually clicking on the blog itself. So even though the posts are being liked, I’m not getting very many views.
2. Building Traffic – Advertising
Now, I’m thinking how do I even let people know about the blog in the first place? I’ve mostly been using Pinterest and creating pins using Canva. I experimented with Pinterest Ads, but it was too expensive and I didn’t get enough clicks to make it worth my while yet. Here is an example of a pin I made for one of my blog posts. I’m considering starting a Twitter account to post tips of the day and drive traffic from there.
3. Search Engine Optimization (SEO)
This is probably the part I still have the most to learn about. The actual building of the site came pretty easily to me since I’ve had to build sites for school projects before. There are a number of websites that let you search for keywords, but the biggest piece of advice I’ve found is to search for long tail keywords that have lower competition. So, perhaps it’s being search 1,000 times a month, but there aren’t many articles written about that particular topic. Turns out the types of things I like to write about are wildly popular and written about all the time. This is definitely an area of improvement that I’ll keep learning about it and working on for future posts.
4. Revenue – making money from the blog
I’ve watched tons of YouTube videos and read other blog posts to try and figure this one out. It seems you need a combination of advertising, affiliate links, sponsored ads, and even your own personalized premium content. Well, I certainly have lots of ideas and things in the works, but it’s not going to happen overnight. So, for now I’m just utilizing the WordPress Ads that is built in to the site functions and some Amazon affiliate links. For transparency, my site ran about 450 ads in February and it generated a revenue of $0.04 and about 1000 ads in March for a revenue of $0.01. Obviously, I was disappointed with the lower number this month even with higher views, so I searched what could be going on. It seems that advertisers might be bidding lower prices for space and my content just hasn’t had enough time to saturate. That’s okay. I actually have a 15-18 month plan in place and this is just the start.
I wanted to share some of the things I’m learning about building a blog here with you in this post. Feel free to drop a comment with any tips you have. Let’s help each other!
HP Instant Ink is really cool. I was having a conversation with my friend today and she was complaining about having to go buy ink for her printer. She needed to print some things for work but had just run out of ink. Well, I solved this issue years ago.
The great thing about HP Instant Ink is that with the subscription I never have to go to the store to buy ink. It’s connected to my wireless HP Envy printer. It knows when my ink is running low and mails it to me. I am then able to mail my blank ink cartridges back for recycling free of charge.
I started using HP Instant Ink in 2016. The first plan I chose was $9.99/month for 300 pages, which is the frequent printing plan, which is now $11.99/month. The great thing is that I’m able to monitor my usage each month and change my subscription accordingly. So, now my subscription is for $2.99/month for up to 50 pages. This is due to a concerted effort to move to digital preservation whenever possible.
The whole process is so easy and automated. If I need to print more, I can increase my subscription pages or if I need to print less, I can reduce it. My online account shows exactly how many pages a month I am printing.
I highly recommend getting an HP printer and checking out HP Instant Ink!
Note: Links are affiliate links and could earn a commission.
I was having a conversation with my friend today and she was complaining about having to go buy ink for her printer. She needed to print some things for work, but had just run out of ink. Well, I solved this issue years ago.
I started using HP Instant Ink in 2016. The first plan I chose was $9.99/month for 300 pages, which is the frequent printing plan, which is now $11.99/month. The great thing is that I’m able to monitor my usage each month and change my subscription accordingly. So, now my subscription is for $2.99/month for up to 50 pages. This is due to a concerted effort to move to digital preservation whenever possible.
The great thing about HP Instant Ink is that with the subscription I never have to go to the store to buy ink. It’s connected to my wireless HP Envy printer. It knows when my ink is running low and mails it to me. I am then able to mail my blank ink cartridges back for recycling free of charge.
The whole process is so easy and automated. If I need to print more, I can increase my subscription pages or if I need to print less, I can reduce it. My online account shows exactly how many pages a month I am printing.
I highly recommend getting an HP printer and checking out HP Instant Ink!
Note: Links are affiliate links and could earn a commission.
Keyboard shortcuts for Macs can be really helpful to staying productive and working more efficiently. I am a long-time Apple user. I do have to say that I preferred my 2013 Macbook Pro to my current 2020 Macbook Air.
However, the one thing that remains the same is my desire to do tasks quickly and efficiently. To do so, I have some settings that make switching between projects pretty easy. I also use helpful keyboard shortcuts for Macs whenever possible.
I’ll share some of my favorite features here.
Keyboard shortcuts for Macs
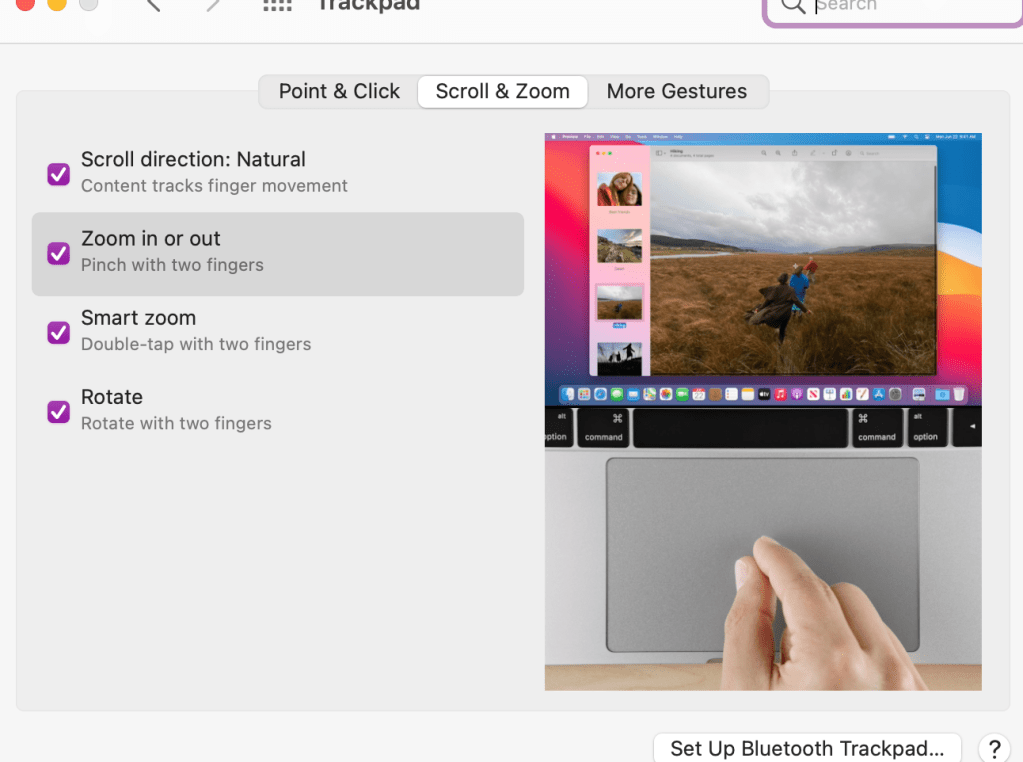
Double tap the trackpad to zoom in and out quickly. Now, to make sure you have your settings the way you want them, you should go into your settings to trackpad and choose the features you think will help you best. Here is what I have turned on:
2. Mission control – swipe up with three fingers. I use this to have multiple desktops going at one time. I can separate my work projects on different desktops and then swipe up or left or right to go between desktops.
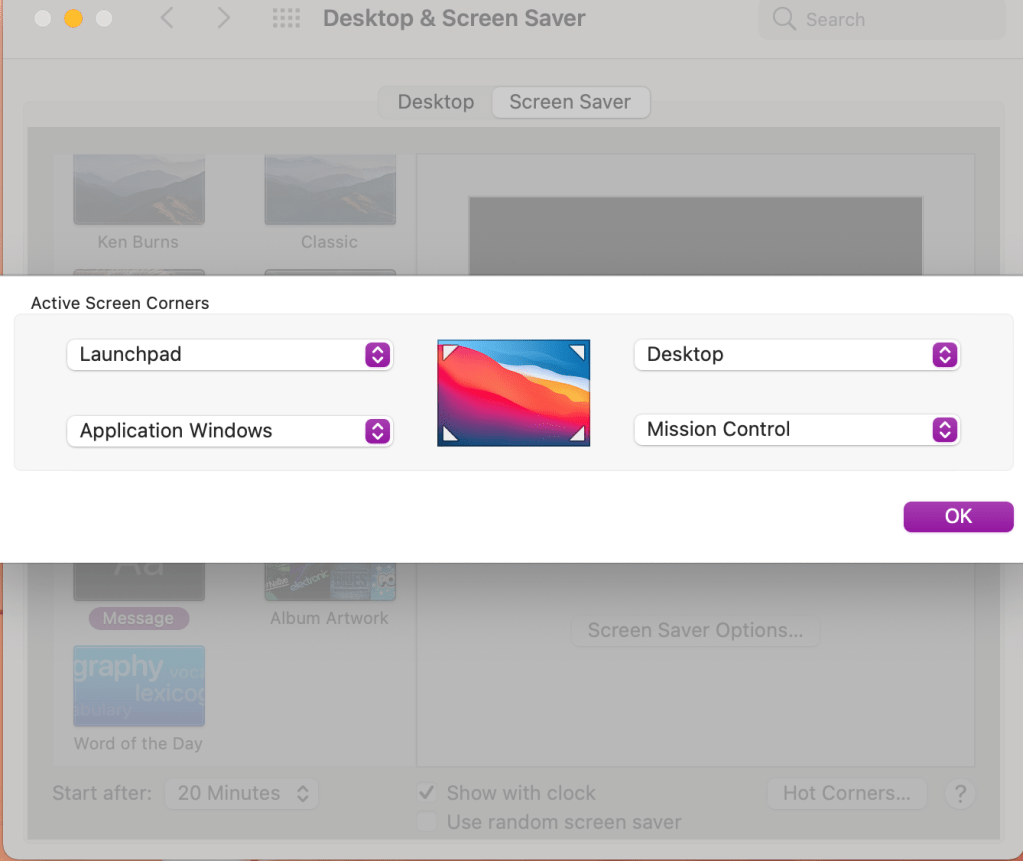
3. Setting up hot corners. Go into your desktop and screensaver settings. You can choose which shortcut you want each corner of your desktop to represent.
4. Take screenshots using Command + Shift + 4. I use this all the time to draw the box around whatever screenshot I’m taking. If you want to check out your other keyboard shortcuts go into your settings to keyboard and click on shortcuts.
5. And then just one favorite keyboard shortcut for good measure. Command + z. It doesn’t undo everything, but well, almost everything. I use this quite frequently for anytime I make a mistake. It’s like a quick undo button.
I hope this information was helpful! Please leave a comment on other tips and tricks you’d like to see.
At the beginning of the pandemic I’m sure many of us worked from our bed because it was comfy and convenient. If you’re still doing that, it could be taking a toll on you mentally and physically. Here are some of the tips I use that I tell my friends and students when I’m working with them:
Designate a specific work space separate from where you sleep. If you’re having trouble sleeping at night and constantly use the computer or scroll through your phone, you may want consider putting those down and making sure the bed is your sleep zone. For a long time, I didn’t have the luxury of a separate room so I had a tiny desk that I used in my bedroom. Then I used my kitchen table when I had my own one bedroom. Now, I’m fortunate to have an office and it has made a huge difference in my mental capacity to get work done and separate sleep and rest time.
If you do work in bed, use some sort of support for your laptop like a lap desk. This helps keep it flat and cushions the surface for you underneath. I use this more when I’m on the couch and watching TV in the background if I’m doing any type of mindless work. Some people even prefer to use a laptop tray to hold their work items.
Use a battery operated alarm clock and put your phone across the room at night. Resist the urge to check your phone for texts or emails when you first wake up in the morning. Most people use their phones as their alarm clock, but a simple switch to another alarm can create that barrier to get your morning started off on the right note.
*Note that links are affiliate links and provide a commission if used.