Posted in Uncategorized

Using SkillShare to Learn How to Make a Digital Planner

FREE PDF DOWNLOAD BELOW!

One of the things I really wanted to learn how to do this year with my iPad was to create a digital planner. I am very much a paper and pen kind of person, but I am trying to minimize the amount of paper items that I utilize.

I follow K Digital Studio on YouTube and Kirstin does an amazing job providing step by step instructions switching to digital note-taking. I actually watched her class on how to make a digital planner on SkillShare, which you can try for 30 days free through my referral link here.

She teaches you how to build a digital planner using Keynote on both the iPad and MacBook. It was a pretty easy process overall with the most time-consuming piece of linking the slides back to the month and week calendars.

I created a blank cover for my planner and linked monthly calendars with the tabs on the sides. For example, here is my August 2021 monthly view of the calendar.

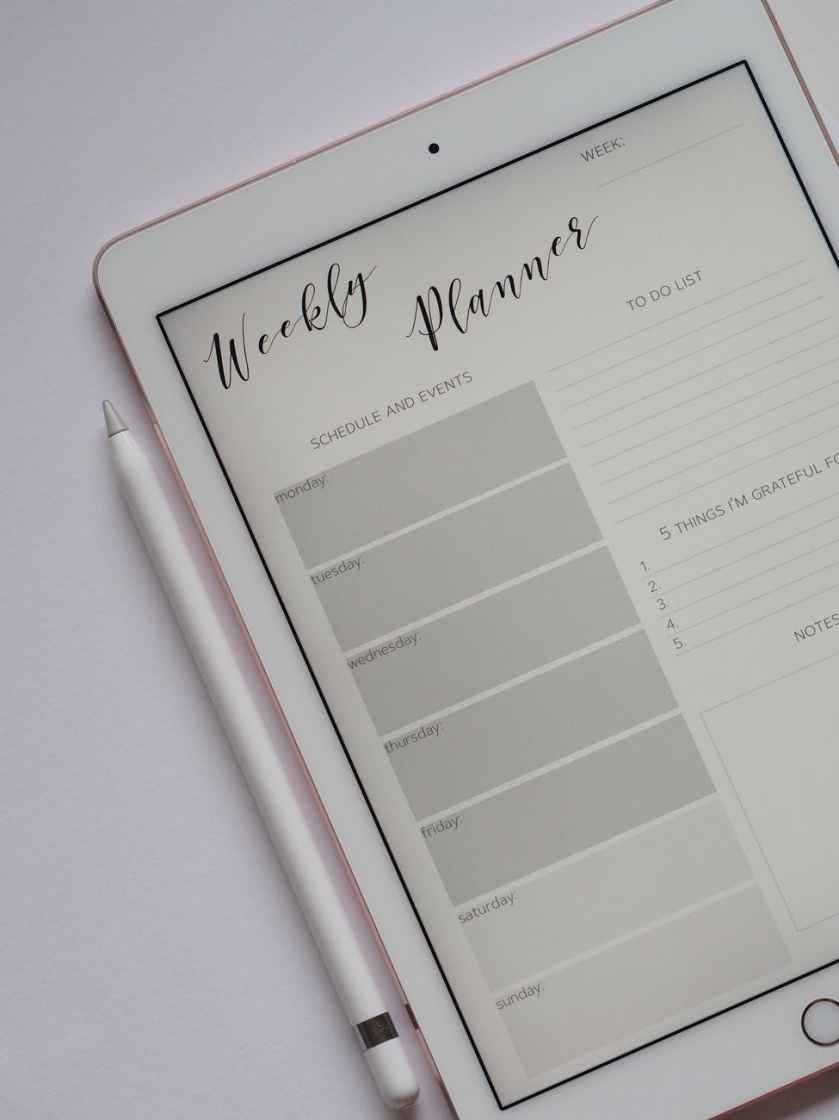
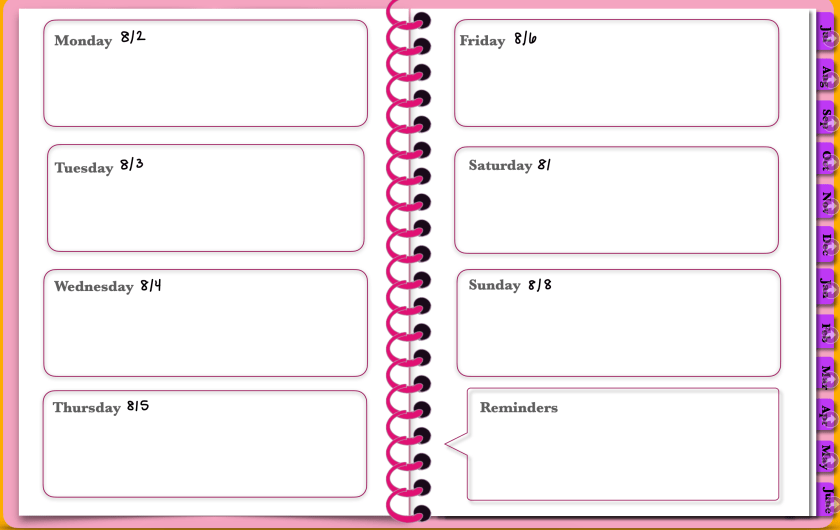
In Kirstin’s class, she teaches you how to make an undated planner, but I went ahead and dated mine for July 2021 – June 2022 in my own handwriting. Here are my daily pages:

I then exported the Keynote file to PDF and downloaded it to my GoodNotes app to use for the rest of the year!

My goal is to continue using SkillShare to learn how to make other digital products that I can sell online through my website and through Etsy.

Because this is my first attempt and I’m planning to use this version myself, I am providing a FREE download of the digital planner here:

Let me know what you think about it!

Posted in Uncategorized

Sending and Receiving Emails – Important or Just a Lot of Work?

Receiving emails is just as much work as sending emails. I was listening to a podcast recently about the nature of emails in the work world. The premise was that it has, in fact, decreased productivity and lessened our ability to engage in deep thinking. This podcast was from The Next Big Idea, hosted by Rufus Griscom and Cal Newport.

The episode discusses the evolution of emails and strategies to continue to engage in deep thinking despite the ongoing distractions of the email barrage. They note “Communication overload undermines your productivity, erodes your focus, zaps your energy, and makes you miserable.” On average, people check their email every six minutes.

Now, people receive over 100 business emails a day. The most recent data I could find was from 2015, with an average of 121 emails per day. Even articles posted in 2017-2019 referenced this 2015 study.

I wanted to test out my emails in and out for one week. My contract work is slowing down so this is to be expected a much slower pace of emails than I have typically dealt with in the past.

Here is the breakdown of my email usage (sending and receiving emails):

receiving emails

So most days, I was below the average number of emails received. As you can see from my emails out, not every email needed a reply from me. It may have been a subscription or information that I filed away in my folders. I like to keep my emails organized as much as possible.

Another study from Harvard Business Review found that most people have an average of 200 emails in their inbox and only respond to about 25% of those messages.

What Cal Newport argues is that not everything needs to be an email. There is a really nice blog post with 3 rules for reducing emails. Additionally, I recommend listening to the podcast episode to get some takeaways on how to reduce emails and for organizations to create better systems and processes for handling information.

I look forward to reading Cal Newport’s book, A World Without Email: Reimagining Work in Age of Communication Overload. I believe this thought process to be the future of work and it’s time for entrepreneurs to get ahead of the game and find resources to streamline communication. I’ll post a review once I finish reading it!

Posted in Uncategorized

My 4 Favorite Google Calendar Settings and Features

Google calendar settings can set you up for success!

Settings and Sharing

google calendar settings

I use my Google Calendar for all of my professional and personal tasks. So, I share it with anyone who might need to get a hold of me or schedule something. However, I do not necessarily need them to see all of the event details, so I choose the option of just Free/Busy.

Notifications

Normally, I don’t like to have a lot of notifications coming through on my email, but I do have some calendar notifications set up. If something is changed or canceled, I do like the email to come through so I’m aware of it. That way, I don’t just happen to notice it missing from my calendar at a later time. Another helpful notification is to get a daily agenda from your calendar emailed to you. This helps as you think about planning your day each morning.

Color Coding Events

Originally, I utilized the create calendar feature to make a separate calendar for each of my activities. But then I realized if I was using the share calendar feature to alert people to my availability I would have to then share all of those calendars with them. So although it takes a second longer when I create an event … After I make it on my calendar, I right click the event and then change the color to match my coding for that activity. Then, at a glance, I can see what responsibilities I have for my freelance work, my teaching, and my school.

Multiple Time Zones

Another setting you can utilize on the calendar is to have more than one time zone displayed. This is helpful if you have to coordinate meetings with people who live in a different area. I have to do this and so I have two different time zones on my calendar to make it easier for me to plan meetings with others.

Overall, I find Google Calendar simple and user friendly. I like that I can access it on all my devices and put everything in one place!

Posted in Uncategorized

4 Useful iPad Pro Accessories and Why I Love my Ipad Pro

I bought an iPad in January 2021 and I’m so excited to continue learning cool apps and features to best utilize all it has to offer. Apple’s iPad sales witnessed an impressive 57% surge in 2020, as reported by TabletFeast.com, highlighting the significance of accessories in enhancing the user experience.

I will do another post about the apps I use on the iPad, but I wanted to share some of the accessories I have and what I’m thinking about purchasing. Additionally, here is a YouTube video describing some of my favorite features of my iPad.

And if you like writing on paper, check out this amazing screen protector that makes it feel like you are writing on a notebook.

  1. Cover – This cover is nice because it is lightweight, has space for the Apple Pencil, and stands up with the little triangle fold at the bottom. I chose the violet color and so far, it has worked out great for me.
  1. Paperlike screen protector– This sticky screen protector actually makes it feel like you’re writing on paper with the Apple pencil. It still has the touchscreen capability and gives you the notebook feel.

Other iPad Pro Accessories I’m Considering

  1. Bluetooth keyboard with iPad stand – right now I have an external keyboard and mouse that I use with my laptop stand, but I’m considering getting this all-in-one keyboard iPad stand.
  1. Apple Pencil case – I’m not sure if I want to get the case because I don’t know if it will fit in the charging dock on the iPad without having to take the case off each time. So, I’m holding off on this purchase for now.

What are your suggestions on other helpful iPad Pro accessories? I’d love to hear them!

Posted in Technology Tips, Work From Home

Do you still go to the store to buy ink for your printer?

I was having a conversation with my friend today and she was complaining about having to go buy ink for her printer. She needed to print some things for work, but had just run out of ink. Well, I solved this issue years ago.

I started using HP Instant Ink in 2016. The first plan I chose was $9.99/month for 300 pages, which is the frequent printing plan, which is now $11.99/month. The great thing is that I’m able to monitor my usage each month and change my subscription accordingly. So, now my subscription is for $2.99/month for up to 50 pages. This is due to a concerted effort to move to digital preservation whenever possible.

The great thing about HP Instant Ink is that with the subscription I never have to go to the store to buy ink. It’s connected to my wireless HP Envy printer. It knows when my ink is running low and mails it to me. I am then able to mail my blank ink cartridges back for recycling free of charge.

The whole process is so easy and automated. If I need to print more, I can increase my subscription pages or if I need to print less, I can reduce it. My online account shows exactly how many pages a month I am printing.

I highly recommend getting an HP printer and checking out HP Instant Ink!

Note: Links are affiliate links and could earn a commission.

Posted in Uncategorized

HP Instant Ink can help you solve your at home printing issues right away

HP Instant Ink is really cool. I was having a conversation with my friend today and she was complaining about having to go buy ink for her printer. She needed to print some things for work but had just run out of ink. Well, I solved this issue years ago.

The great thing about HP Instant Ink is that with the subscription I never have to go to the store to buy ink. It’s connected to my wireless HP Envy printer. It knows when my ink is running low and mails it to me. I am then able to mail my blank ink cartridges back for recycling free of charge.

I started using HP Instant Ink in 2016. The first plan I chose was $9.99/month for 300 pages, which is the frequent printing plan, which is now $11.99/month. The great thing is that I’m able to monitor my usage each month and change my subscription accordingly. So, now my subscription is for $2.99/month for up to 50 pages. This is due to a concerted effort to move to digital preservation whenever possible.

HP Instant Ink
Photo by ANTONI SHKRABA on Pexels.com

The whole process is so easy and automated. If I need to print more, I can increase my subscription pages or if I need to print less, I can reduce it. My online account shows exactly how many pages a month I am printing.

I highly recommend getting an HP printer and checking out HP Instant Ink!

Note: Links are affiliate links and could earn a commission.

Posted in Technology Tips, Work From Home

Keyboard and trackpad shortcuts for Macs

I am a long time Apple user. I do have to say that I preferred my 2013 Macbook Pro to my current 2020 Macbook Air. However, the one thing that remains the same is my desire to do tasks quickly and efficiently. To do so, I have some settings that make switching between projects pretty easy. I also use helpful keyboard and trackpad shortcuts whenever possible. I’ll share some of my favorite features here.

  1. Double tap the trackpad to zoom in and out quickly. Now, to make sure you have your settings the way you want them, you should go into your settings to trackpad and choose the features you think will help you best. Here is what I have turned on:

2. Mission control – swipe up with three fingers. I use this to have multiple desktops going at one time. I can separate my work projects on different desktops and then swipe up or left or right to go between desktops.

3. Setting up hot corners. Go into your desktop and screensaver settings. You can choose which shortcut you want each corner of your desktop to represent.

4. Take screenshots using Command + Shift + 4. I use this all the time to draw the box around whatever screenshot I’m taking. If you want to check out your other keyboard shortcuts go into your settings to keyboard and click on shortcuts.

5. And then just one favorite keyboard shortcut for good measure. Command + z. It doesn’t undo everything, but well, almost everything. I use this quite frequently for anytime I make a mistake. It’s like a quick undo button.

I hope this information was helpful! Please leave a comment on other tips and tricks you’d like to see.

Posted in Uncategorized

5 Helpful Keyboard shortcuts for Macs

Keyboard shortcuts for Macs can be really helpful to staying productive and working more efficiently. I am a long-time Apple user. I do have to say that I preferred my 2013 Macbook Pro to my current 2020 Macbook Air.

However, the one thing that remains the same is my desire to do tasks quickly and efficiently. To do so, I have some settings that make switching between projects pretty easy. I also use helpful keyboard shortcuts for Macs whenever possible.

I’ll share some of my favorite features here.

Keyboard shortcuts for Macs

  1. Double tap the trackpad to zoom in and out quickly. Now, to make sure you have your settings the way you want them, you should go into your settings to trackpad and choose the features you think will help you best. Here is what I have turned on:
keyboard shortcuts for mac

2. Mission control – swipe up with three fingers. I use this to have multiple desktops going at one time. I can separate my work projects on different desktops and then swipe up or left or right to go between desktops.

keyboard shortcuts for mac

3. Setting up hot corners. Go into your desktop and screensaver settings. You can choose which shortcut you want each corner of your desktop to represent.

keyboard shortcuts for mac

4. Take screenshots using Command + Shift + 4. I use this all the time to draw the box around whatever screenshot I’m taking. If you want to check out your other keyboard shortcuts go into your settings to keyboard and click on shortcuts.

keyboard shortcuts for mac

5. And then just one favorite keyboard shortcut for good measure. Command + z. It doesn’t undo everything, but well, almost everything. I use this quite frequently for anytime I make a mistake. It’s like a quick undo button.

I hope this information was helpful! Please leave a comment on other tips and tricks you’d like to see.

Posted in Technology Tips

My Favorite Google Chrome Extensions

I have both a Macbook Air laptop and an HP desktop computer. I use Google Chrome as my Internet browser in both places. I can sign in to my Google account and all my preferences are saved, included my chrome extensions. In this post I want to share some of my favorite Google Chrome extensions that I use on a regular basis. I will share my top 5, ending with my favorite one!

5. GIPHY for Chrome – I love this extension as a teacher because I can easily add GIF’s or emojis to Google Slides or emails just by opening the extension, searching for what I want, and then dragging it onto my page.

Good Morning Hello GIF by Hill's Pet Nutrition

4. Grammarly – I do have the paid account for Grammarly, but this is such a helpful tool. It connects to everything I do online and checks my spelling and grammar as I go. I highly recommend the invest if you do a lot of writing. The paid version even checks your email for the tone.

3. Screencastify – This extension is great for recording screencast videos or screenshots. You can capture your web browser, whole desktop, add your video in, and edit the videos to share with others. I use this to create tutorials for my students.

2. Mercury Reader – A rocket ship icon that turns on and off serves the basis of this extension. Essentially, it helps to make websites with lots of advertisements more readable. When you turn on Mercury Reader, it reduces all that background “stuff” and just gives a clear text to scroll through and read. This is another tool I recommend to students to speed up reading online and doing research.

  1. Momentum – And my favorite extension by far is the Momentum extension (it looks like a little green M&M). Every time I open a new tab I see a beautiful image with a quote. I can write my focus for the day and it even has a spot to add my to do list. It saves so it’s always there when I open a new tab for the day. Since the images change, it links back to the original photographer and I can view more beautiful images. I just absolutely LOVE this extension!!

I use other extensions, but these are my favorite and most frequently used. Leave a comment if you’d like to hear about others!

Posted in Uncategorized

Google Chrome Extensions: 5 Awesome Ones to Try

There are so many Google Chrome extensions to choose from. I have both a Macbook Air laptop and an HP desktop computer. I use Google Chrome as my Internet browser in both places. I can sign in to my Google account and all my preferences are saved, included my chrome extensions. In this post, I want to share some of my favorite Google Chrome extensions that I use on a regular basis. I will share my top 5, ending with my favorite one!

My 5 Favorite Google Chrome Extensions

5. GIPHY for Chrome – I love this extension as a teacher because I can easily add GIF’s or emojis to Google Slides or emails just by opening the extension, searching for what I want, and then dragging it onto my page.

Google Chrome extensions

4. Grammarly – I do have the paid account for Grammarly, but this is such a helpful tool. It connects to everything I do online and checks my spelling and grammar as I go. I highly recommend the invest if you do a lot of writing. The paid version even checks your email for the tone.

3. Screencastify – This extension is great for recording screencast videos or screenshots. You can capture your web browser, whole desktop, add your video in, and edit the videos to share with others. I use this to create tutorials for my students.

2. Mercury Reader – A rocket ship icon that turns on and off serves the basis of this extension. Essentially, it helps to make websites with lots of advertisements more readable. When you turn on Mercury Reader, it reduces all that background “stuff” and just gives a clear text to scroll through and read. This is another tool I recommend to students to speed up reading online and doing research.

  1. 1. Momentum – And my favorite extension by far is the Momentum extension (it looks like a little green M&M). Every time I open a new tab I see a beautiful image with a quote. I can write my focus for the day and it even has a spot to add my to do list. It saves so it’s always there when I open a new tab for the day. Since the images change, it links back to the original photographer and I can view more beautiful images. I just absolutely LOVE this extension!!

I use other extensions, but these are my favorite and most frequently used. Leave a comment if you’d like to hear about others!