Posted in artificial intelligence, the future of work

Learning to Use Midjourney: 3 Things I was Excited to Learn

An AI art platform

Sticker image generated by author using MidJourney

Do you know how to use Midjourney?

The other night, I was hanging out with a friend, and I was telling her about my new projects on Midjourney. She then asked, “What’s that?”

You know how sometimes we can get so familiar with what we know that we assume others know it, too?

Well, it gave me pause to realize that maybe not everyone knows about Midjourney yet. 

As of July, Midjourney had around 15 million users, which, compared to the size of the 8 billion world population, is relatively small. 

So chances are, there are people in your life who have never heard of Midjourney. Including maybe you. 

Disclaimer: I’m not an expert, but I will share some of the things I’ve learned and am still learning with you here. 

What is Midjourney?

Essentially, it is a generative artificial intelligence (AI) program that takes prompts as inputs to create images. You tell it what you want it to create and out pops 4 different images. 

Is it free to use Midjourney?

Yes and no. There is a free option with limited options, but I personally like using the basic subscription for $10/month. From there I can create images in my own chat discussion with the Midjourney bot.

plan showing the costs to use Midjourney, ranging from $10/month to $120/month
Screenshot of the Midjourney subscription plans

Let’s take a look at how it works:

When you open the discord server, you will be able to create prompts in chatrooms. You type /imagine …. followed by the prompt for your image.

Prompt: /imagine vintage green floral design with leaves and stem minimal white background clipart. 

4 boxes with green flower clipart
Screenshot of Midjourney output

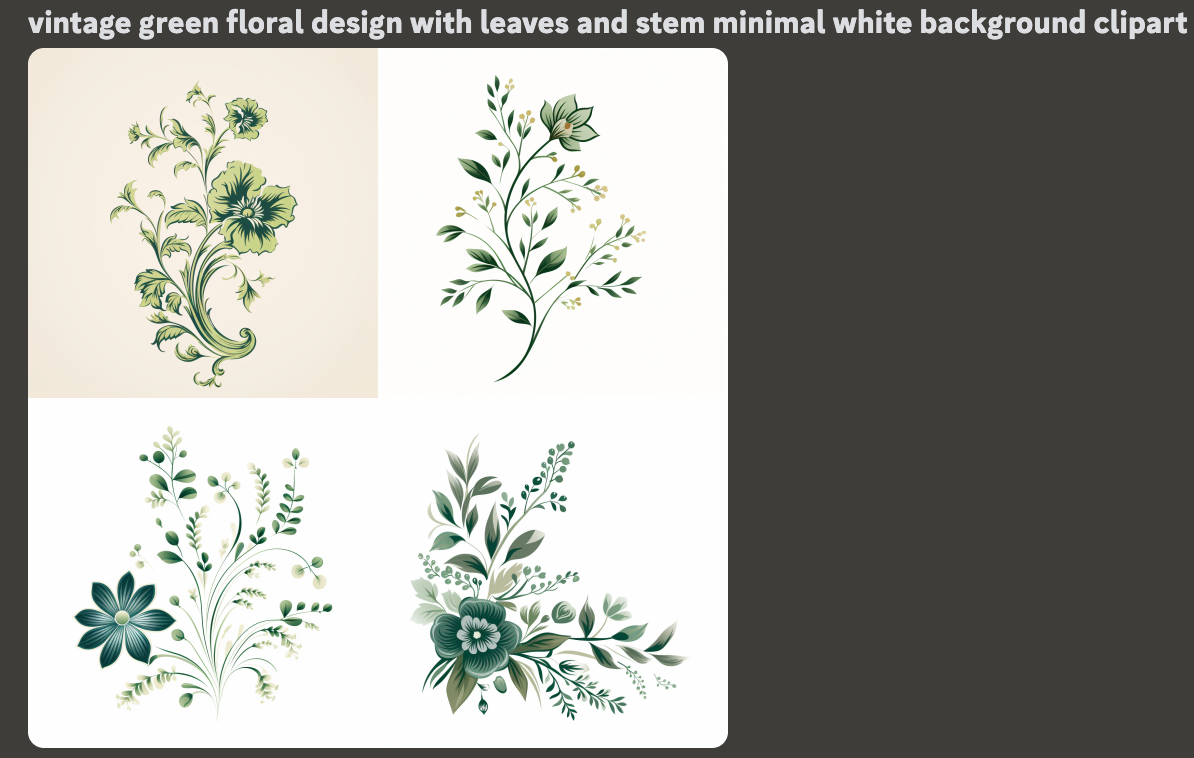
After inputting your prompt, you will get 4 different image options to choose from. As you can see, it’s not perfect since I asked for a white background and one of the images does not have a white background. 

There are so many potential keywords and combinations that you can use. Once those 4 images are generated, you have the option to upscale the one you want to use, or create variations of your favorite one. 

four possible Halloween coloring book covers with pumpkins
screenshot of Midjourney output

The numbers correspond to:

Top left: 1, Top right: 2, Bottom left: 3, Bottom right: 4

Why do you need to upscale the images?

You may wish to use the image in a larger format or sell as clipart or on a printable. The importance of using a good upscaler is so that you don’t lose resolution are have it look to pixelated the larger it gets. 

From everything I’ve read and watched, Midjourney doesn’t currently have the option to upscale it enough to have that high quality. Therefore, a third-party upscaling site is usually recommended. 

3 things I was excited to learn about in Midjourney:

  1. You can change the aspect ratio to be landscape or portrait to match the goals of your image. Use two dashed and ar and then the ratio you are trying to achieve.
screenshot of ar prompt in Midjourney

2. Use brackets to create multiple images with the same prompt all in one command. Basically you create your prompt as you want it to be. This may take several test iterations. And then you use {book, pumpkin, broom, etc.}. Instead of having to copy and paste the prompt for each item, you can use the curly brackets and it will make all of them at once. 

Midjourney output of pumpkins and books

3. Use photorealistic and vivid imagery — the more you describe, the more detailed the image outcome is. Prompt from this list of “50 Midjourney Prompts to Create Photorealistic Art.

screenshot of Midjourney prompt and output of a waterfall 

I still have a long way to go before I’m an expert on creating AI art, but I’m excited to see where it takes me. 

Midjourney is just one of many platforms that can be used. Which one is your favorite?

Posted in Uncategorized

4 Things I Learned About Starting a New Blog

Starting a new blog is hard work

I wanted to start this blog to share information about what I already know and what I’m learning as well as create a potential outlet for passive income in the future. What I’m finding is that I enjoy writing posts and learning about the technical side of building a website and this really could be more than a side passion if I put my mind to it.

So, one of the things I’m learning is actually how to get this blog going in the first place to build it into something meaningful. I’ve done research by watching YouTube videos and being an expert Googler, but there are still some things that I’m working on. Here are some things that I learned so far:

1. Building Traffic – difference between views and likes

I’m using WordPress premium as my hosting platform. Now that I have about 20 posts on the blog, I’m getting consistent notifications about likes on my posts, which is very exciting. I thought that would immediately translate into more views, but that is not the case. So of course, I Googled it to find out what was going on.

It turns out that most of my readers are viewing the posts through WordPress Reader and liking it there and not actually clicking on the blog itself. So even though the posts are being liked, I’m not getting very many views. Therefore, I need to figure out how to get people to click on the blog and read other content.

2. Building Traffic – Advertising

Now, I’m thinking how do I even let people know about the blog in the first place? I’ve mostly been using Pinterest and creating pins using Canva. I experimented with Pinterest Ads, but it was too expensive and I didn’t get enough clicks to make it worth my while yet. Here is an example of a pin I made for one of my blog posts. I’m considering starting a Twitter account to post tips of the day and drive traffic from there.

starting a new blog

3. Search Engine Optimization (SEO)

This is probably the part I still have the most to learn about. The actual building of the site came pretty easily to me since I’ve had to build sites for school projects before. There are a number of websites that let you search for keywords, but the biggest piece of advice I’ve found is to search for long-tail keywords that have lower competition. This is called search engine optimization.

So, perhaps it’s being searched 1,000 times a month, but there aren’t many articles written about that particular topic. Turns out the types of things I like to write about are wildly popular and written about all the time. This is definitely an area of improvement that I’ll keep learning about it and working on for future posts. Perhaps I’ll take an SEO course to help improve my knowledge. It’s something I wish I knew earlier about starting a new blog.

4. Revenue – making money from the blog

One of the reasons of starting a new blog is to make passive income. I’ve watched tons of YouTube videos and read other blog posts to try and figure this one out. It seems you need a combination of advertising, affiliate links, sponsored ads, and even your own personalized premium content. Well, I certainly have lots of ideas and things in the works, but it’s not going to happen overnight. So, for now, I’m just utilizing the WordPress Ads that is built in to the site functions and some Amazon affiliate links.

For transparency, my site ran about 450 ads in February and it generated a revenue of $0.04 and about 1000 ads in March for a revenue of $0.01. Obviously, I was disappointed with the lower number this month even with higher views, so I searched what could be going on. It seems that advertisers might be bidding lower prices for space and my content just hasn’t had enough time to saturate. That’s okay. I actually have a 15-18 month plan in place and this is just the start.

I wanted to share some of the things I’m learning about starting a new blog here with you in this post. Feel free to drop a comment with any tips you have. Let’s help each other!

Posted in Blogging, Personal Skills

What I’m Learning About Starting a Blog in 2021

I wanted to start this blog to share information about what I already know and what I’m learning as well as create a potential outlet for passive income in the future. What I’m finding is that I enjoy writing posts and learning about the technical side of building a website and this really could be more than a side passion if I put my mind to it. So, one of the things I’m learning is actually how to get this blog going in the first place to build it into something meaningful. I’ve done research by watching YouTube videos and being an expert Googler, but there are still some things that I’m working on. Here are some things that I learned so far:

1. Building Traffic – difference between views and likes

I’m using WordPress premium as my hosting platform. Now that I have about 20 posts on the blog, I’m getting consistent notifications about likes on my posts, which is very exciting. I thought that would immediately translate into more views, but that is not the case. So of course, I Googled it to find out what was going on. It turns on out that most of my readers are viewing the posts through WordPress Reader and liking it there and not actually clicking on the blog itself. So even though the posts are being liked, I’m not getting very many views.

2. Building Traffic – Advertising

Now, I’m thinking how do I even let people know about the blog in the first place? I’ve mostly been using Pinterest and creating pins using Canva. I experimented with Pinterest Ads, but it was too expensive and I didn’t get enough clicks to make it worth my while yet. Here is an example of a pin I made for one of my blog posts. I’m considering starting a Twitter account to post tips of the day and drive traffic from there.

3. Search Engine Optimization (SEO)

This is probably the part I still have the most to learn about. The actual building of the site came pretty easily to me since I’ve had to build sites for school projects before. There are a number of websites that let you search for keywords, but the biggest piece of advice I’ve found is to search for long tail keywords that have lower competition. So, perhaps it’s being search 1,000 times a month, but there aren’t many articles written about that particular topic. Turns out the types of things I like to write about are wildly popular and written about all the time. This is definitely an area of improvement that I’ll keep learning about it and working on for future posts.

4. Revenue – making money from the blog

I’ve watched tons of YouTube videos and read other blog posts to try and figure this one out. It seems you need a combination of advertising, affiliate links, sponsored ads, and even your own personalized premium content. Well, I certainly have lots of ideas and things in the works, but it’s not going to happen overnight. So, for now I’m just utilizing the WordPress Ads that is built in to the site functions and some Amazon affiliate links. For transparency, my site ran about 450 ads in February and it generated a revenue of $0.04 and about 1000 ads in March for a revenue of $0.01. Obviously, I was disappointed with the lower number this month even with higher views, so I searched what could be going on. It seems that advertisers might be bidding lower prices for space and my content just hasn’t had enough time to saturate. That’s okay. I actually have a 15-18 month plan in place and this is just the start.

I wanted to share some of the things I’m learning about building a blog here with you in this post. Feel free to drop a comment with any tips you have. Let’s help each other!

Posted in Uncategorized

4 Useful iPad Pro Accessories and Why I Love my Ipad Pro

I bought an iPad in January 2021 and I’m so excited to continue learning cool apps and features to best utilize all it has to offer. Apple’s iPad sales witnessed an impressive 57% surge in 2020, as reported by TabletFeast.com, highlighting the significance of accessories in enhancing the user experience.

I will do another post about the apps I use on the iPad, but I wanted to share some of the accessories I have and what I’m thinking about purchasing. Additionally, here is a YouTube video describing some of my favorite features of my iPad.

And if you like writing on paper, check out this amazing screen protector that makes it feel like you are writing on a notebook.

  1. Cover – This cover is nice because it is lightweight, has space for the Apple Pencil, and stands up with the little triangle fold at the bottom. I chose the violet color and so far, it has worked out great for me.
  1. Paperlike screen protector– This sticky screen protector actually makes it feel like you’re writing on paper with the Apple pencil. It still has the touchscreen capability and gives you the notebook feel.

Other iPad Pro Accessories I’m Considering

  1. Bluetooth keyboard with iPad stand – right now I have an external keyboard and mouse that I use with my laptop stand, but I’m considering getting this all-in-one keyboard iPad stand.
  1. Apple Pencil case – I’m not sure if I want to get the case because I don’t know if it will fit in the charging dock on the iPad without having to take the case off each time. So, I’m holding off on this purchase for now.

What are your suggestions on other helpful iPad Pro accessories? I’d love to hear them!

Posted in Technology Tips

My iPad Pro Accessories

I bought an iPad in January and I’m so excited to continue learning cool apps and features to best utilize all it has to offer. I will do another post about the apps I use on the iPad, but I wanted to share some of the accessories I have and what I’m thinking about purchasing.

  1. Cover – This cover is nice because it is lightweight, has space for the Apple Pencil, and stands up with the little triangle fold at the bottom. I chose the violet color and so far, it has worked out great for me.
  2. Paperfeel screen protector – This sticky screen protector actually makes it feel like you’re writing on paper with the Apple pencil. It still has the touchscreen capability and even helps to suppress sunlight.

What I’m thinking about buying:

  1. Bluetooth keyboard with iPad stand – right now I have an external keyboard and mouse that I use with my laptop stand, but I’m considering getting this all in one keyboard iPad stand.
  2. Apple Pencil case – I’m not sure if I want to get the case because I don’t know if it will fit in the charging dock on the iPad without having to take the case off each time. So, I’m holding off on this purchase for now.

What are your suggestions? I’d love to hear them!

Note: Links are affiliate links associated with possible commission.

Posted in Technology Tips, Work From Home

Do you still go to the store to buy ink for your printer?

I was having a conversation with my friend today and she was complaining about having to go buy ink for her printer. She needed to print some things for work, but had just run out of ink. Well, I solved this issue years ago.

I started using HP Instant Ink in 2016. The first plan I chose was $9.99/month for 300 pages, which is the frequent printing plan, which is now $11.99/month. The great thing is that I’m able to monitor my usage each month and change my subscription accordingly. So, now my subscription is for $2.99/month for up to 50 pages. This is due to a concerted effort to move to digital preservation whenever possible.

The great thing about HP Instant Ink is that with the subscription I never have to go to the store to buy ink. It’s connected to my wireless HP Envy printer. It knows when my ink is running low and mails it to me. I am then able to mail my blank ink cartridges back for recycling free of charge.

The whole process is so easy and automated. If I need to print more, I can increase my subscription pages or if I need to print less, I can reduce it. My online account shows exactly how many pages a month I am printing.

I highly recommend getting an HP printer and checking out HP Instant Ink!

Note: Links are affiliate links and could earn a commission.

Posted in Uncategorized

HP Instant Ink can help you solve your at home printing issues right away

HP Instant Ink is really cool. I was having a conversation with my friend today and she was complaining about having to go buy ink for her printer. She needed to print some things for work but had just run out of ink. Well, I solved this issue years ago.

The great thing about HP Instant Ink is that with the subscription I never have to go to the store to buy ink. It’s connected to my wireless HP Envy printer. It knows when my ink is running low and mails it to me. I am then able to mail my blank ink cartridges back for recycling free of charge.

I started using HP Instant Ink in 2016. The first plan I chose was $9.99/month for 300 pages, which is the frequent printing plan, which is now $11.99/month. The great thing is that I’m able to monitor my usage each month and change my subscription accordingly. So, now my subscription is for $2.99/month for up to 50 pages. This is due to a concerted effort to move to digital preservation whenever possible.

HP Instant Ink
Photo by ANTONI SHKRABA on Pexels.com

The whole process is so easy and automated. If I need to print more, I can increase my subscription pages or if I need to print less, I can reduce it. My online account shows exactly how many pages a month I am printing.

I highly recommend getting an HP printer and checking out HP Instant Ink!

Note: Links are affiliate links and could earn a commission.

Posted in Technology Tips, Work From Home

Keyboard and trackpad shortcuts for Macs

I am a long time Apple user. I do have to say that I preferred my 2013 Macbook Pro to my current 2020 Macbook Air. However, the one thing that remains the same is my desire to do tasks quickly and efficiently. To do so, I have some settings that make switching between projects pretty easy. I also use helpful keyboard and trackpad shortcuts whenever possible. I’ll share some of my favorite features here.

  1. Double tap the trackpad to zoom in and out quickly. Now, to make sure you have your settings the way you want them, you should go into your settings to trackpad and choose the features you think will help you best. Here is what I have turned on:

2. Mission control – swipe up with three fingers. I use this to have multiple desktops going at one time. I can separate my work projects on different desktops and then swipe up or left or right to go between desktops.

3. Setting up hot corners. Go into your desktop and screensaver settings. You can choose which shortcut you want each corner of your desktop to represent.

4. Take screenshots using Command + Shift + 4. I use this all the time to draw the box around whatever screenshot I’m taking. If you want to check out your other keyboard shortcuts go into your settings to keyboard and click on shortcuts.

5. And then just one favorite keyboard shortcut for good measure. Command + z. It doesn’t undo everything, but well, almost everything. I use this quite frequently for anytime I make a mistake. It’s like a quick undo button.

I hope this information was helpful! Please leave a comment on other tips and tricks you’d like to see.

Posted in Uncategorized

5 Helpful Keyboard shortcuts for Macs

Keyboard shortcuts for Macs can be really helpful to staying productive and working more efficiently. I am a long-time Apple user. I do have to say that I preferred my 2013 Macbook Pro to my current 2020 Macbook Air.

However, the one thing that remains the same is my desire to do tasks quickly and efficiently. To do so, I have some settings that make switching between projects pretty easy. I also use helpful keyboard shortcuts for Macs whenever possible.

I’ll share some of my favorite features here.

Keyboard shortcuts for Macs

  1. Double tap the trackpad to zoom in and out quickly. Now, to make sure you have your settings the way you want them, you should go into your settings to trackpad and choose the features you think will help you best. Here is what I have turned on:
keyboard shortcuts for mac

2. Mission control – swipe up with three fingers. I use this to have multiple desktops going at one time. I can separate my work projects on different desktops and then swipe up or left or right to go between desktops.

keyboard shortcuts for mac

3. Setting up hot corners. Go into your desktop and screensaver settings. You can choose which shortcut you want each corner of your desktop to represent.

keyboard shortcuts for mac

4. Take screenshots using Command + Shift + 4. I use this all the time to draw the box around whatever screenshot I’m taking. If you want to check out your other keyboard shortcuts go into your settings to keyboard and click on shortcuts.

keyboard shortcuts for mac

5. And then just one favorite keyboard shortcut for good measure. Command + z. It doesn’t undo everything, but well, almost everything. I use this quite frequently for anytime I make a mistake. It’s like a quick undo button.

I hope this information was helpful! Please leave a comment on other tips and tricks you’d like to see.

Posted in Technology Tips

My Favorite Google Chrome Extensions

I have both a Macbook Air laptop and an HP desktop computer. I use Google Chrome as my Internet browser in both places. I can sign in to my Google account and all my preferences are saved, included my chrome extensions. In this post I want to share some of my favorite Google Chrome extensions that I use on a regular basis. I will share my top 5, ending with my favorite one!

5. GIPHY for Chrome – I love this extension as a teacher because I can easily add GIF’s or emojis to Google Slides or emails just by opening the extension, searching for what I want, and then dragging it onto my page.

Good Morning Hello GIF by Hill's Pet Nutrition

4. Grammarly – I do have the paid account for Grammarly, but this is such a helpful tool. It connects to everything I do online and checks my spelling and grammar as I go. I highly recommend the invest if you do a lot of writing. The paid version even checks your email for the tone.

3. Screencastify – This extension is great for recording screencast videos or screenshots. You can capture your web browser, whole desktop, add your video in, and edit the videos to share with others. I use this to create tutorials for my students.

2. Mercury Reader – A rocket ship icon that turns on and off serves the basis of this extension. Essentially, it helps to make websites with lots of advertisements more readable. When you turn on Mercury Reader, it reduces all that background “stuff” and just gives a clear text to scroll through and read. This is another tool I recommend to students to speed up reading online and doing research.

  1. Momentum – And my favorite extension by far is the Momentum extension (it looks like a little green M&M). Every time I open a new tab I see a beautiful image with a quote. I can write my focus for the day and it even has a spot to add my to do list. It saves so it’s always there when I open a new tab for the day. Since the images change, it links back to the original photographer and I can view more beautiful images. I just absolutely LOVE this extension!!

I use other extensions, but these are my favorite and most frequently used. Leave a comment if you’d like to hear about others!